Last week I got my copy of From Scratch by Shaye Elliott of The Elliott Homestead. I bought it on sale from Amazon for just under $16 and, let me tell you, it is worth every penny of it! And I have only made one thing from it!!
Shaye's type of cooking is plain and simple, all from scratch, good for you food. There are no exotic ingredients, nothing weird. You can pronounce everything and find it all locally, probably in your own pantry. It does, however, require just a teensy bit more time than most people are probably used to, at least in the beginning.
This type of food is most beneficial to our bodies when as much of each component is made from scratch as possible. For example, chicken stock. Yes, you can buy it at the store pretty cheaply but then that is exactly what you get cheap, unappetizing food. Store bought stock isn't going to nourish your body the way your own homemade stock will. Why? Because food manufacturers have(?) to put in all kinds of preservatives, additives, colorings etc. in order to make a product that can sit on the shelves for years without ever decomposing. If it can last that long in a package, imagine what it will be doing in your intestines! So you want to make as many of the ingredients yourself as you possibly can.
The recipe I made for lunch today was Chicken Soup with Coconut and Cilantro. Oh my word, it was sooooo good. I never knew I liked cilantro until today. The smell is just so fresh and the taste...Oh!
This recipe actually started yesterday with some chicken stock making. This is an extremely easy thing to do but it does take a little bit of time. First, you want to get you a good chicken. I didn't use my own because my hens are more valuable to me for their eggs than for their meat. Plus I haven't ordered my "meat" chickens yet:) So I used a pastured chicken from the store. Yes it is more expensive but I won't compromise on meat for my family. So I cut the chicken up. This is a bit more tricky than I thought it would be. Hubby is going to have to sharpen my knife after I sawed through the bones! There are supposed to be joints you cut through but I never found 'em. So you cut up the whole chicken and put it in the crock pot (put in the neck and gizzards too) along with a couple of cut up carrots, celery and onion. Add 8-12 cups of water, depending on the size of your crock pot. You want it to be about 1 1/2 inches from the rim. Add in 1/4-1/2 c. apple cider vinegar and then put the lid on it. Cook on high until it starts to boil then turn it down to low. Let it cook for 12-24 hours. Once your house is smelling so good that you can't stand it, turn off the crock pot and get to separating the good stuff in there. Put all the meat in one bowl and all the cooked down veggies, bones and skin in another. Feel free to give the veggie/bone bowl to your pets. The bones have softened from the long cook and they are no longer dangerous. I gave mine to our pig and I have never seen her focused on eating in all the time we have had her!
Next, you need to strain the liquid to get out any other bits and pieces. You will need a fine mesh strainer or use come cheesecloth in a colander to strain it all out. Put the broth into a couple of containers and put in the fridge. You want the fat to thicken up on top of the broth so that it can be skimmed off. Once it is skimmed off, you can portion your broth and freeze it or put it into canning jars and can it. Here is a great tutorial for canning broth.
Once, the meat is cool enough to handle, remove it from the rest of the bones and skin. Shred the meat and portion it out however you need to. I just put a bit in the fridge to make the soup I mentioned above and then put a couple of cups into some freezer bags for future meals. Helpful hint, freeze the bags flat so that you can stack them once frozen to save space in the freezer.
Okay, now that you have some liquid chicken "gold" put up and some shredded chicken set aside, it is time to make this nummy soup!
Into a stockpot, put 3 1/2 cups chicken stock, 1 can full fat organic coconut milk, about a teaspoon fresh grated ginger (buy a root, keep in the freezer, grate as needed. Trust me on this!), 1/4 tsp of red pepper flakes, 1 tsp. liquid aminos (like soy sauce but better for you), 1/2 - 1 tbsp. sweetener (such as raw honey or sucanat. NOT SPLENDA!!!)1 cup shredded cooked chicken and 1 cup egg noodles. Bring all of it to a boil then turn down the heat and let it simmer until the noodles are cooked al dente. You will need to salt the soup so check it now and add what you need. Serve with chopped cilantro (do NOT leave that out!) and some chopped green onions. This recipe made enough for 3 big bowls of soup and you can double it if needed.
(I tweaked this recipe a little so it isn't exactly what is in the cookbook)
Try it. Soon. By the cookbook. Now. That's all.
Showing posts with label Recipes. Show all posts
Showing posts with label Recipes. Show all posts
Wednesday, July 24, 2013

Monday, January 7, 2013
Pioneer Woman Fettuccine Alfredo
I love the Pioneer Woman....I told my husband that I would approve of him moving her into our house. I would share him as long as she would cook for me! (and she could bring Marlboro Man, too. I'm fine with that). Now, back to reality. If I can't have her cook for me, then I will have to be content with cooking her recipes myself.
Yesterday was monthly shopping. It is an all day event because the store I love is and hour away from my house. There is also lunch out at Pickle Barrel. My kids love that place and it is on the way to the store. Can't shop on an empty stomach! We didn't get home until after 5pm and, of course, I didn't premake anything for dinner because we had no food! So, Pioneer Woman's fettuccini alfredo to the rescue! This is, by far, the simplest, tastiest alfredo recipe I have ever made.
INGREDIENTS
When pasta is done, drain it and set aside for just a second. Take 1/2 the cheese and put it in the pot you cooked the pasta in. Pour the cream and butter mixture over it and stir it to combine. Dump the pasta on top of that and mix it up very well. Sprinkle the rest of the cheese over the pasta. Serve immediately.
Because I forgot to get any veggies prepped beforehand, I added a bag of frozen peas to the boiling pasta during the last 5 minutes of cooking time. We would have had homemade french bread but hubby ate every.single.piece! Anyway, it really hit the spot. If you really want to add a new dimension to it, add a few drops of hot sauce to it. I don't know why it works but it really makes it taste even better, and I don't even like hot sauce!
I did have a picture of the finished product but apparently Blogger knows how bad a photographer I am and they have caused my picture insert button to not work.
Yesterday was monthly shopping. It is an all day event because the store I love is and hour away from my house. There is also lunch out at Pickle Barrel. My kids love that place and it is on the way to the store. Can't shop on an empty stomach! We didn't get home until after 5pm and, of course, I didn't premake anything for dinner because we had no food! So, Pioneer Woman's fettuccini alfredo to the rescue! This is, by far, the simplest, tastiest alfredo recipe I have ever made.
INGREDIENTS
- 1 lb. Fettuccini Noodles
- 1 Stick Butter (this is Pioneer Woman after all!!)
- 1 C. Heavy Cream
- Salt and Pepper to taste
- 2 C. freshly Grated Parmesan Cheese (Please don't use that Kraft stuff. It is NOT the same)
When pasta is done, drain it and set aside for just a second. Take 1/2 the cheese and put it in the pot you cooked the pasta in. Pour the cream and butter mixture over it and stir it to combine. Dump the pasta on top of that and mix it up very well. Sprinkle the rest of the cheese over the pasta. Serve immediately.
Because I forgot to get any veggies prepped beforehand, I added a bag of frozen peas to the boiling pasta during the last 5 minutes of cooking time. We would have had homemade french bread but hubby ate every.single.piece! Anyway, it really hit the spot. If you really want to add a new dimension to it, add a few drops of hot sauce to it. I don't know why it works but it really makes it taste even better, and I don't even like hot sauce!
I did have a picture of the finished product but apparently Blogger knows how bad a photographer I am and they have caused my picture insert button to not work.
Friday, January 4, 2013
Spicy Chicken Pinwheels
Here is another one of those finger foods from Christmas Eve. You can make these as spicy (or not!) as you want.
SPICY CHICKEN PINWHEELS
In a large bowl, mix together cream cheese, drained tomatoes, shredded cheese, remaining spices, garlic, cilantro (if using) and scallions. Mix until it is very well combined. Add in shredded chicken and mix.
Lay out tortillas and spread some of the mixture all over the tortillas, up to 1 inch from the edges. You don't want to use too much mixture as your pinwheels will be to bulky. I think we used about an 1/8 to 1/4 C for each one. Make sure mixture is evenly distributed. Roll each tortilla tightly (it helps to press down as you roll so it sticks to itself), like a burrito, but don't fold in the sides like a burrito. Using a sharp knife, cut each tortilla roll into 1 inch slices and place on a serving tray. Keep these cold until you are ready to serve.
There are no pictures of these because I have a 13 year old boy who ate most of them BEFORE we went to church. It was too hard to hold the camera with one hand and fight him off with the other!
SPICY CHICKEN PINWHEELS
- 1 1/2 lbs. Boneless, Skinless Chicken Breasts
- Salt and Pepper to taste
- 1 Can Ro-tel, drained
- 12 oz. Softened Cream Cheese
- 1 Cup. Shredded Cheese
- 1 Clove Garlic, Minced
- 3 Tsp. Chili Powder (I used half this amount cuz I am a wuss)
- 1 Tsp. Cumin
- 1/2 Tsp. Cayenne Pepper
- 1/2 Tsp. Garlic Salt (I used Powdered Garlic instead)
- 1/4 C. Cilantro, Chopped (optional)
- 6 Scallions, White and Green Parts, Sliced
- 6-8 Large Flour Tortillas, room temperature
In a large bowl, mix together cream cheese, drained tomatoes, shredded cheese, remaining spices, garlic, cilantro (if using) and scallions. Mix until it is very well combined. Add in shredded chicken and mix.
Lay out tortillas and spread some of the mixture all over the tortillas, up to 1 inch from the edges. You don't want to use too much mixture as your pinwheels will be to bulky. I think we used about an 1/8 to 1/4 C for each one. Make sure mixture is evenly distributed. Roll each tortilla tightly (it helps to press down as you roll so it sticks to itself), like a burrito, but don't fold in the sides like a burrito. Using a sharp knife, cut each tortilla roll into 1 inch slices and place on a serving tray. Keep these cold until you are ready to serve.
There are no pictures of these because I have a 13 year old boy who ate most of them BEFORE we went to church. It was too hard to hold the camera with one hand and fight him off with the other!
Thursday, January 3, 2013
Mini Taco Bites
For Christmas Eve, we usually just have a bunch of finger foods because we don't get home from church until 7:30-8 pm and cooking a full meal is just taking time away from...PRESENTS!!!!
No, really we just need something quick to throw together to get everyone fed and finger food fits the bill.
This little recipe comes from Pinterest. Yes, I am a Pinterest junkie. I will not even try to hide it anymore!
These little bites go together quickly and you can feed a crowd with them!

MINI TACO BITES
a bit of shredded cheese.
Bake at 350F for 8-10 minutes until wrappers are browned and crispy and cheese is melted.
Remove from muffin pan and fill with your favorite toppings.
No, really we just need something quick to throw together to get everyone fed and finger food fits the bill.
This little recipe comes from Pinterest. Yes, I am a Pinterest junkie. I will not even try to hide it anymore!
These little bites go together quickly and you can feed a crowd with them!

MINI TACO BITES
- Wonton Wrappers
- Taco meat (brown some ground meat and add your favorite taco seasoning)
- Shredded Cheese
- Taco toppers such as salsa, lettuce, sour cream, whatever you like.
a bit of shredded cheese.
 |
| Looks like someone forgot the cheese??? |
Bake at 350F for 8-10 minutes until wrappers are browned and crispy and cheese is melted.
Remove from muffin pan and fill with your favorite toppings.
Wednesday, January 2, 2013
Hot Dog Buns
I have been making all of our bread products for almost a year now. All, that is, except hot dog buns. For some reason, I just could never get them to turn out right so I continued to buy them. We don't eat hot dogs a whole lot but I still hated buying them. The last time we had them, hubby took one bite and said they were just too disgusting and could I please find a way to make them homemade. Well of course I can, dear. And I did!
The following recipe can be used for either hamburger or hot dog buns. They only change is in how you shape them.
HOMEMADE BUNS
Hamburger buns
Divide the dough evenly into 12-16 pieces, depending on how big or small you want your buns.
Shape into smooth balls and place on a parchment paper covered baking sheet. Flatten the balls a bit.
Hot dog buns
Roll dough into a long, narrow rectangle. Divide dough into bun sections and place on a parchment paper lined baking sheet. Leave sides touching.


Cover and let dough rise for about 30-35 minutes until they are about doubled in size.
Bake at 400F for 10 to 12 minutes.
If you would like "stuff" on your buns to flavor them, brush beaten egg on the top and sprinkle with minced onion, poppy seeds, sesame seeds, whatever you like, just before you put them into the oven.
These are very tasty buns and infinitely better than store bought!
I found that the hot dog buns are easier to stuff if you split them on the top instead of down the side.
Just one more thing I can cross off my "buy at the store" list!
The following recipe can be used for either hamburger or hot dog buns. They only change is in how you shape them.
 |
| Love these Applegate Farm Beef Hotdogs! |
HOMEMADE BUNS
- 1 Cup Milk
- 1/2 Cup Water
- 1/4 Cup Butter
- 4 1/2 Cups Flour (you can mix and match but I used all wheat)
- 2 1/4 Tsp. Yeast (or one envelope)
- 1 Tbsp. Raw Honey
- 1 1/2 Tsp. Salt
- 1 Egg, beaten well
Hamburger buns
Divide the dough evenly into 12-16 pieces, depending on how big or small you want your buns.
Shape into smooth balls and place on a parchment paper covered baking sheet. Flatten the balls a bit.
Hot dog buns
Roll dough into a long, narrow rectangle. Divide dough into bun sections and place on a parchment paper lined baking sheet. Leave sides touching.


Cover and let dough rise for about 30-35 minutes until they are about doubled in size.
Bake at 400F for 10 to 12 minutes.
If you would like "stuff" on your buns to flavor them, brush beaten egg on the top and sprinkle with minced onion, poppy seeds, sesame seeds, whatever you like, just before you put them into the oven.
These are very tasty buns and infinitely better than store bought!
I found that the hot dog buns are easier to stuff if you split them on the top instead of down the side.
Just one more thing I can cross off my "buy at the store" list!
Thursday, December 20, 2012
Creamy Orzo with Asparagus and Parmesan
Sometimes I find some really cool recipes on Pinterest. This is definitely one of them.

CREAMY ORZO W/ASPARAGUS AND PARMESAN
Directions
Bring approximately 4 cups of water to a boil over medium heat. (You do not have to be precise about the water amount as you will be straining the pasta and veggies once cooked.) Once water is boiling, dump in pasta and set timer for 5 minutes. Once pasta has cooked for 5 minutes, add the veggies to the pot and cook veggies and pasta for 5 more minutes. Once the pasta and asparagus are cooked, strain out water and add them back to the empty pot. Add the parmesan and butter and stir until thoroughly combined and butter and cheese have melted. Slowly add the cream, stirring constantly. You may find that you like your pasta more or less creamy so only add enough cream to get your desired consistency. Add in salt and pepper and enjoy.
We had this as a side dish with salmon and it was lovely. This goes with just about anything: steak, seafood, chicken. You could also change up the veggies. Peas would be divine. Adding in some bacon would just push this over the top of the ecstasy meter!
(original recipe posted by sugarandspice-celeste.blogspot.com)

CREAMY ORZO W/ASPARAGUS AND PARMESAN
- 1 C. Orzo pasta
- 1C. Asparagus, cut into 1 inch pieces
- 1 Tbsp. Butter
- 1/4 to 1/2 C. Cream
- 1/4 C. Grated Parmesan
- Salt & Pepper to Taste
Directions
Bring approximately 4 cups of water to a boil over medium heat. (You do not have to be precise about the water amount as you will be straining the pasta and veggies once cooked.) Once water is boiling, dump in pasta and set timer for 5 minutes. Once pasta has cooked for 5 minutes, add the veggies to the pot and cook veggies and pasta for 5 more minutes. Once the pasta and asparagus are cooked, strain out water and add them back to the empty pot. Add the parmesan and butter and stir until thoroughly combined and butter and cheese have melted. Slowly add the cream, stirring constantly. You may find that you like your pasta more or less creamy so only add enough cream to get your desired consistency. Add in salt and pepper and enjoy.
We had this as a side dish with salmon and it was lovely. This goes with just about anything: steak, seafood, chicken. You could also change up the veggies. Peas would be divine. Adding in some bacon would just push this over the top of the ecstasy meter!
(original recipe posted by sugarandspice-celeste.blogspot.com)
Monday, December 17, 2012
Oatmeal...So Good When it's Cold Outside!
I don't ever remember my mom making me oatmeal for breakfast when I was growing up. I was always a cereal kind of girl. As a matter of fact, I don't think I ever even had oatmeal packets until my late teens or early 20's. Shoot, they probably didn't even invent them until then!! Unfortunately, I bought into the whole "all food at the grocery store is good for you" notion for many, many years and always had a box of Quaker oatmeal packets on hand for a quick breakfast.
Oh how things have changed. I was never a huge fan of those packets. My kids liked them well enough but I could take them or leave them.
Enter real food. I started making my own oatmeal and, lo and behold, I liked it. I liked it a lot. For me, there is nothing quite so tummy warming on a cold morning than a nice bowl of oatmeal. Now this isn't simply oats and liquid. No, I like to add stuff. Sometimes, lots of stuff. Right now, I have become fixated on the following combo; oats, milk, raisins, white choc. chips (yeah, I know they aren't real food) and nuts.

The process for making oatmeal is really simple.
Here's what I do:
Oh how things have changed. I was never a huge fan of those packets. My kids liked them well enough but I could take them or leave them.
Enter real food. I started making my own oatmeal and, lo and behold, I liked it. I liked it a lot. For me, there is nothing quite so tummy warming on a cold morning than a nice bowl of oatmeal. Now this isn't simply oats and liquid. No, I like to add stuff. Sometimes, lots of stuff. Right now, I have become fixated on the following combo; oats, milk, raisins, white choc. chips (yeah, I know they aren't real food) and nuts.

The process for making oatmeal is really simple.
Here's what I do:
- Pour some milk into a saucepan. How much completely depends on how much you want to make. I usually use somewhere around 2-2 1/2 cups (could be more, I don't measure) for 3 of us.
- Add in old fashioned oats. I guess you could use quick oats but I like the old fashioned ones better.
- Stir in your add ins like raisins, maple syrup, whatever you are in the mood for.
- Always add in a pinch of salt. Why? I don't know but it just should be done.
- Stir over medium to medium low heat until the oatmeal thickens.
- Enjoy!
Tuesday, December 11, 2012
Pizza Burgers
Okay, I know, summer is gone and so should be the grill. But temps around here have been in the upper 70's so I think the grill can stay for a little while longer.
The other night, we had Pioneer Woman's Pizza Burgers. Holy cow, were they good. A few weeks ago, I made up the patties along with regular hamburger patties, salisbury steaks and meatballs. I love getting a bunch of meals out of only a little bit of work!
Anyway, the flavor of these burgers was outstanding. Like a dummy, I forgot to make up some marinara sauce so we used ketchup and they were still very pizza-flavored. I use these uncured pepperoni by Hormel. Not perfect, but a little better than the other stuff.
These burgers are just a bit different than the standard burger. PW also does a Supreme Pizza Burger by adding all kinds of veggies. There are numerous ways you can make these your own. Make 'em. You'll be happy you did. Plus, your family will love you just a smidge more!
The other night, we had Pioneer Woman's Pizza Burgers. Holy cow, were they good. A few weeks ago, I made up the patties along with regular hamburger patties, salisbury steaks and meatballs. I love getting a bunch of meals out of only a little bit of work!
Anyway, the flavor of these burgers was outstanding. Like a dummy, I forgot to make up some marinara sauce so we used ketchup and they were still very pizza-flavored. I use these uncured pepperoni by Hormel. Not perfect, but a little better than the other stuff.
These burgers are just a bit different than the standard burger. PW also does a Supreme Pizza Burger by adding all kinds of veggies. There are numerous ways you can make these your own. Make 'em. You'll be happy you did. Plus, your family will love you just a smidge more!
Friday, November 30, 2012
Tomato Soup
Awhile back, I posted this Tomato Soup recipe. It's a good one, don't get me wrong. How could anything with cream cheese be bad? Ahem, well, let's just say that sometimes one may find the need for something a bit...lighter. Enter this lovely gem from Kelly at The Nourishing Home. If you have never visited her site, please do. Her food is tasty AND healthy.
I had serious doubts about this recipe, only because I am particular about the taste of my tomato products. I shouldn't have worried. Everything of hers that I have made has turned out really good. Please check this recipe out. It is sooooo good for the cold days ahead. She says that the soup gets better the following day so save any leftovers. That phrase "save leftovers" always makes me laugh because I have a teenaged boy and leftovers are not something that we have. I cook and he consumes. EVERYTHING! It's kind of "our thing". This soup was no different. After he had the last little bit in the pot, he stuck his finger in and licked more out. That is why it is so important to me to make the healthiest food with the best ingredients. If he is going to eat like a linebacker, then the food needs to nourish him. Hence, we love the Nourished Home. You will too.
I had serious doubts about this recipe, only because I am particular about the taste of my tomato products. I shouldn't have worried. Everything of hers that I have made has turned out really good. Please check this recipe out. It is sooooo good for the cold days ahead. She says that the soup gets better the following day so save any leftovers. That phrase "save leftovers" always makes me laugh because I have a teenaged boy and leftovers are not something that we have. I cook and he consumes. EVERYTHING! It's kind of "our thing". This soup was no different. After he had the last little bit in the pot, he stuck his finger in and licked more out. That is why it is so important to me to make the healthiest food with the best ingredients. If he is going to eat like a linebacker, then the food needs to nourish him. Hence, we love the Nourished Home. You will too.
Thursday, November 29, 2012
Salisbury Steak
Man, I have been eating some good food lately. I can't take the credit for this recipe, though. This one is strictly Pioneer Woman. Don't you just love her??! I have been a fan of hers since way before her first cookbook came out.
This recipe is very old school and oh so good. I made up a big batch of the meat and froze it in little loaves. It freezes beautifully (uncooked) by the way. Since Ree always has a great tutorial with her recipes, I will not try and recreate it here. Check it out here. Trust me, this is one recipe you will want to save to make over and over again. Hubby really loved the gravy and now wants me to make that my default meat gravy. The twins loved it, too. My girl actually passed up dessert to have another steak. She doesn't do that very often so, if she turns down pumpkin pie for more salisbury steak, the recipe is a keeper.
I would have taken a picture of how mine turned out but I was half way through eating when I realized I should have taken a picture. I spared you the half-scarfed food pic. You're welcome. Anyway, it looked exactly like Pioneer Woman's did. Honest.
Make this recipe. You will NOT be disappointed!
This recipe is very old school and oh so good. I made up a big batch of the meat and froze it in little loaves. It freezes beautifully (uncooked) by the way. Since Ree always has a great tutorial with her recipes, I will not try and recreate it here. Check it out here. Trust me, this is one recipe you will want to save to make over and over again. Hubby really loved the gravy and now wants me to make that my default meat gravy. The twins loved it, too. My girl actually passed up dessert to have another steak. She doesn't do that very often so, if she turns down pumpkin pie for more salisbury steak, the recipe is a keeper.
I would have taken a picture of how mine turned out but I was half way through eating when I realized I should have taken a picture. I spared you the half-scarfed food pic. You're welcome. Anyway, it looked exactly like Pioneer Woman's did. Honest.
Make this recipe. You will NOT be disappointed!
Wednesday, November 28, 2012
Coconut Flour Muffins
I have an uncle who has some "digestive system issues" so they are exploring a gluten free diet. So, being the wonderful, loving niece that I am (pretty sure I can hear them groaning all the way up here)I decided to do a little experimenting with gluten free flours.

This recipe uses coconut flour that I bought from Tropical Traditions. The recipe actually comes from Laura at Heavenly Homemakers so you can pop over there to see the recipe itself. I made them this morning and they were pretty good. Now, if you are looking for something that tastes like it is made with regular wheat flour, this isn't it. However, they are very tasty. There are some things that I will do differently next time. First of all, as soon as you mix the batter, immediately pour it into a greased muffin pan. I let it sit for a minute on the counter and it kind of glopped up a bit. I also made the mistake of using muffin liners instead of just greasing the muffin tin and they stuck to the paper pretty bad. Note to self-pay attention to the recipe!
All in all, these were a good thing and I will recommend them to my uncle. When I bought the flour, Tropical Traditions was having a sale on it, 2 lbs. for $10. I don't know if this is a good price or not as I have never bought any before but I have noticed that a lot of the recipes using it only call for a small amount so I am hoping it will last for awhile.

This recipe uses coconut flour that I bought from Tropical Traditions. The recipe actually comes from Laura at Heavenly Homemakers so you can pop over there to see the recipe itself. I made them this morning and they were pretty good. Now, if you are looking for something that tastes like it is made with regular wheat flour, this isn't it. However, they are very tasty. There are some things that I will do differently next time. First of all, as soon as you mix the batter, immediately pour it into a greased muffin pan. I let it sit for a minute on the counter and it kind of glopped up a bit. I also made the mistake of using muffin liners instead of just greasing the muffin tin and they stuck to the paper pretty bad. Note to self-pay attention to the recipe!
All in all, these were a good thing and I will recommend them to my uncle. When I bought the flour, Tropical Traditions was having a sale on it, 2 lbs. for $10. I don't know if this is a good price or not as I have never bought any before but I have noticed that a lot of the recipes using it only call for a small amount so I am hoping it will last for awhile.
Thursday, November 8, 2012
Baked Ham Sandwiches
I was browsing around on Satan's site Pinterest the other day and I came across this recipe from Recipe Schmessipie for baked ham sandwiches. What really got my attention was the fact that it was made with those King's Hawaiian dinner rolls. You know the ones. Yes, those wonderful little morsels of sweetness. We use the big round loaves in church for communion and everyone always hopes the pastor will break off a big piece for them, me included!
Anyway, this recipe uses the dinner rolls and it is so yummy!
INGREDIENTS
1 Pkg. King's Hawaiian Dinner Rolls (12 pack)
1 lb. Deli Ham
6-8 Slices Cheese (I used shredded Swiss and Cheddar b/c I haven't sliced my cheese yet!)
1 1/2 Sticks Butter (I used just 1 and it was still scrumptious)
3 Tbsp. Dijon Mustard
1 1/2 Tsp. Worchestershire Sauce
3 Tsp. Poppy Seeds
1 Onion, Chopped (I only used 1/4 onion b/c my girl doesn't like them too much. It was fine)
Preheat oven to 350. In a saucepan, add the butter, mustard, wochestershire, poppy seeds and onion and stir around until butter is melted. Let simmer while you cut the whole pack of rolls in half, horizontally. You want to leave the bottoms all attached to each other and the tops all attached to each other. Grease a 9x13 pan and put the bottom of the rolls in it. Layer on the ham and cheese. Pour about 1/3 of the butter mixture over the ham and cheese. Put the tops of the buns back on and pour the rest of the butter mixture over the top. Smear it around so everything gets covered. Cover the pan and bake for about 15-20 until everything is hot and melty. Enjoy
These were really good but the men in my life complained that I didn't make enough. That is a very common complaint around here lately!!!
Sharing at The Prairie Homestead
Anyway, this recipe uses the dinner rolls and it is so yummy!
 |
| I am NOT a photographer and I don't claim to be. Just happy my thumb isn't in the shot! |
INGREDIENTS
1 Pkg. King's Hawaiian Dinner Rolls (12 pack)
1 lb. Deli Ham
6-8 Slices Cheese (I used shredded Swiss and Cheddar b/c I haven't sliced my cheese yet!)
1 1/2 Sticks Butter (I used just 1 and it was still scrumptious)
3 Tbsp. Dijon Mustard
1 1/2 Tsp. Worchestershire Sauce
3 Tsp. Poppy Seeds
1 Onion, Chopped (I only used 1/4 onion b/c my girl doesn't like them too much. It was fine)
Preheat oven to 350. In a saucepan, add the butter, mustard, wochestershire, poppy seeds and onion and stir around until butter is melted. Let simmer while you cut the whole pack of rolls in half, horizontally. You want to leave the bottoms all attached to each other and the tops all attached to each other. Grease a 9x13 pan and put the bottom of the rolls in it. Layer on the ham and cheese. Pour about 1/3 of the butter mixture over the ham and cheese. Put the tops of the buns back on and pour the rest of the butter mixture over the top. Smear it around so everything gets covered. Cover the pan and bake for about 15-20 until everything is hot and melty. Enjoy
These were really good but the men in my life complained that I didn't make enough. That is a very common complaint around here lately!!!
Sharing at The Prairie Homestead
Monday, November 5, 2012
Easy Cream Cheese Frosting
Just popping in for a quick update on some frosting I made for the twins' birthday cake. I would much rather make their cakes then to have a grocery store do it.
I found this yummy recipe on Pinterest. It's called Ms. Humble's Whipped Cream Cheese Frosting and it is soooooo delightful!
INGREDIENTS
16 Oz. Cream Cheese, room temperature
1 1/2 C. Powdered Sugar
1 Tsp. Vanilla
1 C. Heavy Cream, very cold.
Beat cream cheese, sugar and vanilla until smooth and fluffy. Set aside.
In another bowl, whip the cream to nearly stiff peaks. Fold whipped cream into the cream cheese mixture until combined.
That's it. That's all you do.
What makes this frosting so great is that it isn't overly sweet because the cream cuts the sweetness of the powdered sugar a bit.
This recipe makes a generous amount of frosting. I made a 13x9 cake and this frosted it and provided a bunch for decoration. You could easily halve the recipe...unless you are like me and eat half of it before it ever gets near the cake!
Sharing at The Prairie Homestead
I found this yummy recipe on Pinterest. It's called Ms. Humble's Whipped Cream Cheese Frosting and it is soooooo delightful!
 |
| Don't know why they wanted red, white and blue...They are Fall babies! |
INGREDIENTS
16 Oz. Cream Cheese, room temperature
1 1/2 C. Powdered Sugar
1 Tsp. Vanilla
1 C. Heavy Cream, very cold.
Beat cream cheese, sugar and vanilla until smooth and fluffy. Set aside.
In another bowl, whip the cream to nearly stiff peaks. Fold whipped cream into the cream cheese mixture until combined.
That's it. That's all you do.
What makes this frosting so great is that it isn't overly sweet because the cream cuts the sweetness of the powdered sugar a bit.
This recipe makes a generous amount of frosting. I made a 13x9 cake and this frosted it and provided a bunch for decoration. You could easily halve the recipe...unless you are like me and eat half of it before it ever gets near the cake!
Sharing at The Prairie Homestead
Thursday, October 25, 2012
Making Sauerkraut
A few weeks ago, a new friend gave me 3 heads of cabbage. Dontcha love free stuff?!!! Anyway, I decided that I wanted to make some sauerkraut. So I did. Seriously, this stuff is sooo doggone easy to make, I don't know why I didn't make this before. I saw a demonstration of the process in my Homestead Blessings-The Art of Canning video.
Here's how it goes:
Shred your cabbage to the size you prefer it. I used the grater blade on my food processor but a hand grater works fine, too.
 Once you have the cabbage all grated, start squeezing your cabbage. Water will start running out of it. That's a good thing. Generously sprinkle on salt. The salt will help get the water out of it and it works to preserve the cabbage during the fermentation. There is no measurement for the salt. Just taste test every so often and stop when it is your kind of salty.

 Once you have a nice soggy, drippy mess of cabbage and water (it took me about 5 minutes of squeezing) pack the cabbage and liquid into clean jars. You can use canning jars but any jar with a lid will work. The jars won't be pressure or water bath canned so you can use any lid you want. You don't have to worry about getting a good seal. When you fill the jar, pack the cabbage in there pretty good and leave at least and 1 1/2 inch headspace. As the food ferments, it will shrink up a bit but the liquid may bubble over and out of the jar. This is perfectly fine!!! Just wipe up the mess and keep the jars stored on some newspaper or an old towel so it won't make a mess of your cabinets.
 Once the jars are filled, put the lids on but don't tighten them too much. If the liquid needs to escape, it is better for it to leak out of the jar then to explode it!
The cabbage will need to sit for about 2-3 weeks before you eat it. However, they will remain edible for up to 2 years if stored properly (in a dark, cool room).
 24 hours later, you can see the bubbles forming at the top. The cabbage has already shrunk down quite a bit. Cannot wait to have this with some sausage!
This whole process took me less than an hour and I have 3 quart jars full of vitamin C goodness! I will warn you that your kitchen will smell...ummmm....cabbage-y. You know how cabbage smells, right? Hubs thought someone backed up the toilet when he walked in and got a good whiff. At least it dissapates quickly with the windows open!
Here's how it goes:
Shred your cabbage to the size you prefer it. I used the grater blade on my food processor but a hand grater works fine, too.


See all that water coming out?


The cabbage will need to sit for about 2-3 weeks before you eat it. However, they will remain edible for up to 2 years if stored properly (in a dark, cool room).

This whole process took me less than an hour and I have 3 quart jars full of vitamin C goodness! I will warn you that your kitchen will smell...ummmm....cabbage-y. You know how cabbage smells, right? Hubs thought someone backed up the toilet when he walked in and got a good whiff. At least it dissapates quickly with the windows open!
Tuesday, October 16, 2012
Chicken Bombs

I found this recipe either on a blog or pinterest. I can't remember which and I apologize to whomever posted it. You deserve ALL of the glory for this one!
This chicken is A.Maz.Ing!!!!
No, seriously.
Amazing.
Here is what you need:
(I tweaked the recipe a bit for our tastes)
5 Chicken Breasts (You will slice these in half width wise so you will end up with double the amount so you can adjust for however many servings you need)
5 Jalapeno peppers (I used large slices of green bell pepper because I can't take the heat of jalapenos)
4 Oz. Softened cream cheese
1 Cup Shredded Cheese (I used pepper jack)
20 Slices of Bacon
Take each chicken breast and slice it width wise so you now have double the amount of breasts. They will be thin. Pound them to about a 1/4 inch thickness. Season both sides with salt and pepper.
Mix the softened cream cheese and shredded cheese together in a small bowl until fully combined. Set aside.
Slice the jalapenos in half and remove the seeds and membranes (Make sure you wear gloves!)If you are using bell pepper, just slice into large slices, about 1-1 1/2 inches wide.
Take the cheese mixture and put a large scoop on the pepper slice. Place at the short end of a breast and roll the chicken up around the pepper. Don't worry if the chicken doesn't stay completely rolled. We'll fix that in a minute.
Take 2 slices bacon and lay them side by side, touching. Place the chicken roll at the short end of the bacon and pull the end of the bacon over the top of the chicken and roll until you come to the end of the bacon. The bacon will keep the chicken from unrolling and keeps you from having to use toothpicks.
Next, put the chicken/bacon rolls on a baking sheet and put them into a 375 degree oven. After 10 minutes, take them out of the oven and baste them with your favorite bbq sauce. Put them back in for another 10 minutes. Take them out and baste them with more bbq sauce. Put them in for a final 10 minutes. Take them out and baste them with a bit more bbq sauce. Let them cool for just a minute and serve. Oh, and don't forget to pick all that melted cheese off the baking sheet and scarf it down before anyone else comes in and notices it! I had to fight my kids for it!
Monday, October 15, 2012
Hamburger Veg Soup

This is, without a doubt, the easiest, simplest soup to make. And probably the tastiest soup I have made in a very long time. It came about in a moment of desperation. I needed something to fix for lunch and I just could not come up with anything that sounded remotely edible. Do you ever have those days when the thought of food just grosses you out?
I had some ground beef thawed so I browned it up with some onions and salt/pepper. Then I started cleaning out the fridge and freezer.
This is what was added to the beef: Half a quart of homemade tomato sauce, a can of diced tomatoes, about 4 cups of beef broth and 2 cups of turkey broth (I didn't have any chicken broth), half a bag of frozen corn, half a bag of frozen peas, half a bag of frozen green beans, garlic, oregano and basil. I just stirred everything together, brought it to a boil and then simmered it for about a half hour. About 15 minutes before it was done, I added a cup of orzo pasta and let it cook in the broth.
At lunch time, my son (the veggie hater) loudly exclaimed that he wasn't touching "that gross stuff" so he ate a sandwich instead. The rest of us sat down to a steaming bowl of nourishing goodness. I cannot even begin to describe how good this stuff was. I don't normally like these kinds of soup (I love cream based soups) but it just hit the spot. The aforementioned veggie hater saw how much we were enjoying it and, since he is never "full", he decided to try"just a little bit". He ended up eating 2 full bowls and I had to stop him from eating a 3rd! He didn't even pick around the veggies. He ate every last one of them. This NEVER happens. There are always threats involved to get him to eat his veggies.
This was a great soup to eat and a great way to clean out leftover bags of veggies in the freezer.
Try some of it and you will not regret it!
Sharing at Frugally Sustainable
Friday, September 28, 2012
Taco Pizza
Seeing as how I have totally gone off track with my menu plan for the week, here is a little something I threw together for lunch a few days ago.
Simply make your favorite pizza dough. Then top it with some salsa and taco seasoned, cooked ground beef. Sprinkle on some shredded cheese and bake according to your dough recipe. Once baked, top with shredded lettuce and a dollop of sour cream.
 This was so easy. I needed easy this week. Apparently, I am not so great with "normal" so I'll just stick with easy for now :-)
Sharing at the Prairie Homestead Blog Hop
Simply make your favorite pizza dough. Then top it with some salsa and taco seasoned, cooked ground beef. Sprinkle on some shredded cheese and bake according to your dough recipe. Once baked, top with shredded lettuce and a dollop of sour cream.

Sharing at the Prairie Homestead Blog Hop
Thursday, September 27, 2012
Smooshed Taters
The first week using our new menu plan went flawlessly. I should have known nothing good lasts forever. Oh, it's not the plan that fails. It's my execution of the plan that ends in disaster. This week has stunk pretty bad...and it's only Tuesday! My first "fault" was not bothering to glance at the menu and see what we were having for the week and what prep work needed to be done. Sooooooo, there was no bread baked for the sandwiches for lunch, no tortillas made for the enchiladas for dinner last night. No chicken made for the enchiladas for that dinner either. My kids were so excited to see homemade donuts on the menu for breakfast only to have me burst their bubble with the fact that I never bothered to make the dough the night before! Seriously, what is wrong with me??? I am busy for sure but no busier than any other time. I have been a little short on sleep, though. My dog keeps waking me between 3 and 4 in the morning to go out and I can never fall back asleep until about 30 minutes before my alarm goes off. That does not make for a good day! Today, hubby made me go take a nap after lunch and I slept for 2.5 hours. Guess I was sleepy.....
Well, the following recipe was not scheduled on the menu but, as you already read above, I can't seem to follow the menu plan no how.
I have seen these on a couple of blogs and the recipe is in the Pioneer Woman's new cookbook so I thought I would give them a try. So glad I did! These little suckers are yummy!
SMOOSHED TATERS
Small, round potatoes (I used Dutch Baby's and made 3 per person)
Salt, Pepper, Olive Oil and any herbs you like
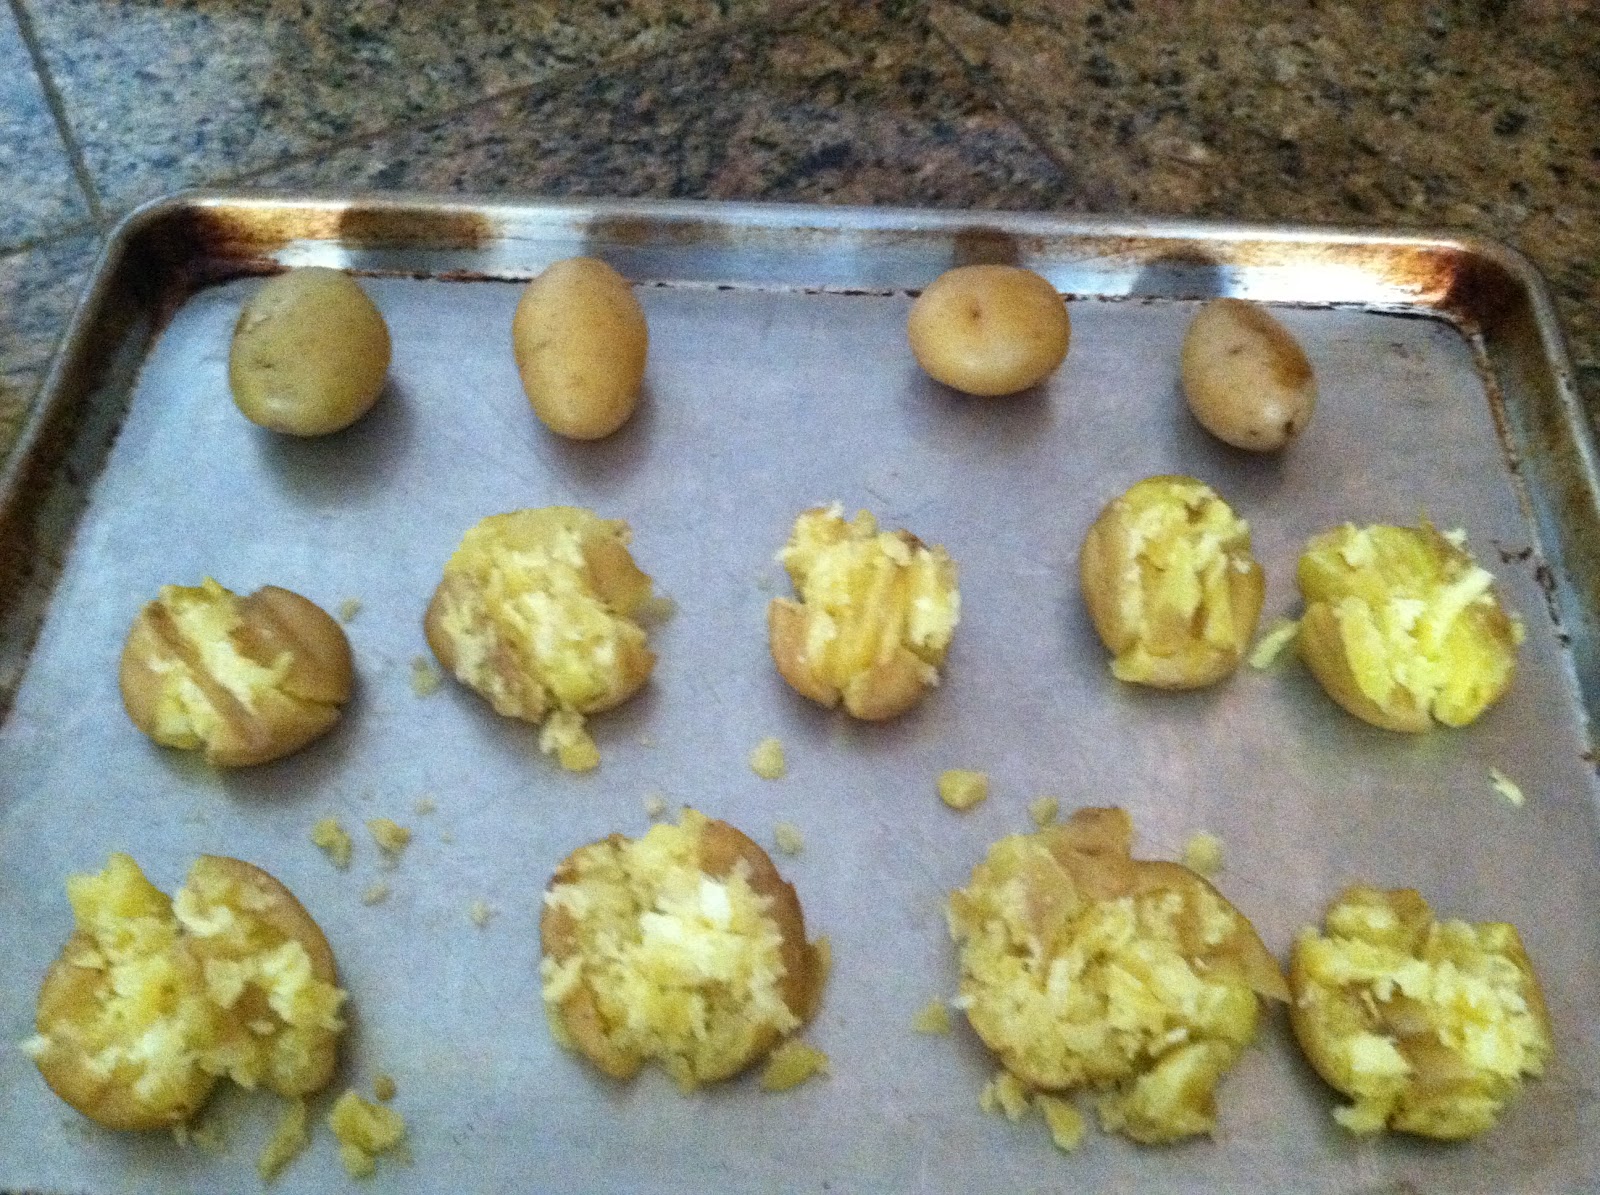
First, boil the potatoes (whole and unpeeled) in salted water until they are fork tender, about 20 minutes. Drain them and dump them out onto a baking sheet. Take a potato masher and "crush" them in one direction, then turn masher 90 degrees and crush again. You want to break the skin but not grind them into oblivion.
 Top row is the boiled potatoes. Middle row is the first crush and bottom row is the second crush. Now, drizzle a bit of olive oil over the top of each potato. Don't be chintzy with the olive oil, you need that bit of fat on there. Then sprinkle with salt, pepper and whatever herbs you are in the mood for. I used parsely and chives.
 Pop the pan into a 450 degree oven for 20-25 minutes and....voila!

Then, and this is totally up to you, sprinkle on a bit of shredded cheese. Recipe didn't call for it but everything tastes better with cheese, if you ask me! Oh, these are sooooo good! We actually eat them with our fingers instead of a fork. They make pretty good finger food!
My daughter even smeared a bit of sour cream on them. You could add bacon, too! The possibilities are endless (just like my to do list!)
Sharing at The Prairie Homestead Blog Hop
Well, the following recipe was not scheduled on the menu but, as you already read above, I can't seem to follow the menu plan no how.
I have seen these on a couple of blogs and the recipe is in the Pioneer Woman's new cookbook so I thought I would give them a try. So glad I did! These little suckers are yummy!
SMOOSHED TATERS
Small, round potatoes (I used Dutch Baby's and made 3 per person)
Salt, Pepper, Olive Oil and any herbs you like
First, boil the potatoes (whole and unpeeled) in salted water until they are fork tender, about 20 minutes. Drain them and dump them out onto a baking sheet. Take a potato masher and "crush" them in one direction, then turn masher 90 degrees and crush again. You want to break the skin but not grind them into oblivion.


Then, and this is totally up to you, sprinkle on a bit of shredded cheese. Recipe didn't call for it but everything tastes better with cheese, if you ask me! Oh, these are sooooo good! We actually eat them with our fingers instead of a fork. They make pretty good finger food!
My daughter even smeared a bit of sour cream on them. You could add bacon, too! The possibilities are endless (just like my to do list!)
Sharing at The Prairie Homestead Blog Hop
Friday, September 21, 2012
Apple Walnut Muffins
Since I made my menu plan for the next 2 weeks, I have no excuse not to cook. Besides, after eating out so much on vacation, I am COMPLETELY ready to eat some good home cooking!
This morning's fare was Apple Walnut Muffins. Since this was the first time I made these muffins, I followed the recipe pretty closely. Next time, I think I will add a little coconut oil to the batter to make it a little more "wet".
APPLE WALNUT MUFFINS
 1 1/2 C. Whole Wheat Pastry Flour ( I just used regular whole wheat flour)
2 Tsp. Baking Powder
1 1/2 Tsp. Cinnamon
1 Tsp. Baking Soda
1/2 Tsp. Salt
2 Eggs
1/3 C. Sucanat
1 1/2 C. Apples, Peeled, Cored and Finely Chopped (About 2-3 apples. I used Fuji)
5 Tbsp. Unsalted Butter, Melted
1/2 C. Walnuts, Coarsely Chopped
Preheat oven to 400 F and line muffin pans with liners (or grease them if you have no liners). Whisk eggs and sucanat together in a medium bowl. Stir in the apples and let them sit for about 10 minutes to release some juice.
In a large bowl, add the dry ingredients (flour through salt) and combine thoroughly.
Once the apples are done sitting, add the melted butter and walnuts to them and stir. Then gently fold the apple mixture into the flour mixture only until it is mostly combined. Overmixing will cause your muffins to be hard and dense. Divide the batter among the muffin cups and bake for 12-15 minutes.
These muffins were really good but the batter was a bit drier than I think it should have been. Next time I will add 1/4 coconut oil to the batter and see what happens.
In the meantime, ENJOY!!!
This morning's fare was Apple Walnut Muffins. Since this was the first time I made these muffins, I followed the recipe pretty closely. Next time, I think I will add a little coconut oil to the batter to make it a little more "wet".
APPLE WALNUT MUFFINS
 1 1/2 C. Whole Wheat Pastry Flour ( I just used regular whole wheat flour)
2 Tsp. Baking Powder
1 1/2 Tsp. Cinnamon
1 Tsp. Baking Soda
1/2 Tsp. Salt
2 Eggs
1/3 C. Sucanat
1 1/2 C. Apples, Peeled, Cored and Finely Chopped (About 2-3 apples. I used Fuji)
5 Tbsp. Unsalted Butter, Melted
1/2 C. Walnuts, Coarsely Chopped
Preheat oven to 400 F and line muffin pans with liners (or grease them if you have no liners). Whisk eggs and sucanat together in a medium bowl. Stir in the apples and let them sit for about 10 minutes to release some juice.
In a large bowl, add the dry ingredients (flour through salt) and combine thoroughly.
Once the apples are done sitting, add the melted butter and walnuts to them and stir. Then gently fold the apple mixture into the flour mixture only until it is mostly combined. Overmixing will cause your muffins to be hard and dense. Divide the batter among the muffin cups and bake for 12-15 minutes.
These muffins were really good but the batter was a bit drier than I think it should have been. Next time I will add 1/4 coconut oil to the batter and see what happens.
In the meantime, ENJOY!!!
Wednesday, August 15, 2012
Stuffed Meatball Subs
Something weird has been happening to my taste buds lately. They're changing. Why? I don't know but they are definitely different. I know this because my son has been eating a lot of my sandwiches lately. What does that have to do with my taste buds? I'll tell you. For some reason, every time I make a sandwich that I really think I want, I take one bite and it is NOT something I want. The whole taste makes me sick. Really. One day I made 3 different sandwiches, thinking I just didn't like that particular sandwich. Nope, I couldn't stomach any of them. So the boy ate them. ALL of them. He's 12, eats anything that isn't nailed down and still only weighs 155 lbs. I really dislike his ability to do that. But I digress. The point is that previously loved sandwiches make me ill now so I have to find something else to fill that midday meal requirement.
Enter...The stuffed sub. Oh yeah, baby. This sandwich rocks! But it is not for the faint of heart. Nor is it for those who only eat like birds. No, this is a MAN sandwich. Except us girls loved it too!
Okay, this first thing I did was mix up a batch of my french bread dough. I let it do its first rise. While it was rising, I took Pioneer Woman's Comfort Meatballs out of the fridge (I had defrosted them the other day and needed to use them up). I stuck them in a large ziplock with a little flour, shook em up and dumped them into a hot skillet to cook em up a bit. I cooked them a little more through for this recipe than I do when I follow Pioneer Woman's recipe because these won't cook in the oven as long. So once I got the meatballs all done, I took my bread dough, punched it down and divided it into 4 pieces simply because I was feeding 4 people. Each piece made about a foot long sub. I took a piece of dough and rolled it out into a flat rectangle. I then took some sauce (a can of tomato sauce, a small can of tomato paste and a can of diced tomatoes simmered for a little while with whatever spices you have handy)and spooned it on to the dough right down the center. I didn't use a ton, probably a bit less than 1/4 cup. Then I took a 4th of the meatballs and put them over the sauce and put a hardy sprinkling of shredded mozzarella over that. Then I pulled the dough up over the cheese and pinched the seams together and put it on a parchment lined baking sheet, seam side down. I baked them at 350 for about 25 minutes, just until the dough was nice and browned. I served them with the left over sauce so we could do some dippin' and, man o man, they were sensational!

I'm getting hungry just looking at this picture!
Sharing at The Praire Homestead
Enter...The stuffed sub. Oh yeah, baby. This sandwich rocks! But it is not for the faint of heart. Nor is it for those who only eat like birds. No, this is a MAN sandwich. Except us girls loved it too!
Okay, this first thing I did was mix up a batch of my french bread dough. I let it do its first rise. While it was rising, I took Pioneer Woman's Comfort Meatballs out of the fridge (I had defrosted them the other day and needed to use them up). I stuck them in a large ziplock with a little flour, shook em up and dumped them into a hot skillet to cook em up a bit. I cooked them a little more through for this recipe than I do when I follow Pioneer Woman's recipe because these won't cook in the oven as long. So once I got the meatballs all done, I took my bread dough, punched it down and divided it into 4 pieces simply because I was feeding 4 people. Each piece made about a foot long sub. I took a piece of dough and rolled it out into a flat rectangle. I then took some sauce (a can of tomato sauce, a small can of tomato paste and a can of diced tomatoes simmered for a little while with whatever spices you have handy)and spooned it on to the dough right down the center. I didn't use a ton, probably a bit less than 1/4 cup. Then I took a 4th of the meatballs and put them over the sauce and put a hardy sprinkling of shredded mozzarella over that. Then I pulled the dough up over the cheese and pinched the seams together and put it on a parchment lined baking sheet, seam side down. I baked them at 350 for about 25 minutes, just until the dough was nice and browned. I served them with the left over sauce so we could do some dippin' and, man o man, they were sensational!

Sharing at The Praire Homestead
Subscribe to:
Posts (Atom)